Welcome to PennyParser 👋
Stop wasting time with manual entry or unreliable bank connectors that frequently fail. PennyParser puts you in control: you verify your own bank accounts and simply provide a screenshot. Our AI parses the data for you instantly, saving you time and hassle.
🌟 What can you do with PennyParser?
- 📅 Annual Income Insights: Track exactly how much you earned in 2025 across all salary deposits.
- 🔍 Deep Transaction Search: Find that cheap "Spirit" flight from 2023 in seconds, even if you forgot which card you used.
- 💰 Cashback Aggregation: Total up your rewards and cashback across all accounts to see your real savings.
- 📈 Investment Monitoring: Track gains/losses for your 401k, IRA, or 529 plans without the manual math.
- 🍔 Spending Breakdowns: Instantly see how much you spend on groceries, gas, or dining out every month.
- 🛡️ Subscription Audit: Identify forgotten subscriptions that are silently draining your balance.
This guide walks you through everything from logging in for the first time to exporting your data to Excel.
1. Your First Time: Setting Up From Scratch
When you open PennyParser for the first time, you start with a completely clean slate — no examples, no dummy data.
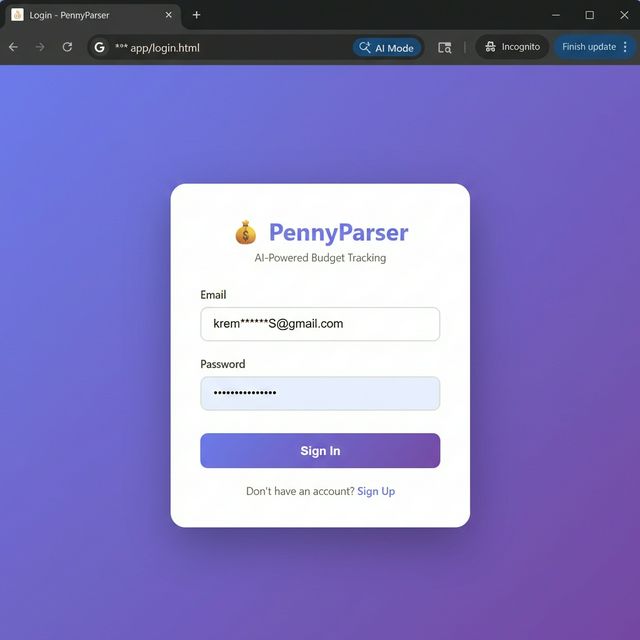
Step 1 — Log In
Open the app URL in your browser. You'll see the PennyParser login card with two fields:
- Email — the address you registered with.
- Password — your chosen password.
Click Sign In to continue. If this is your first time, click Sign Up to create a free account.
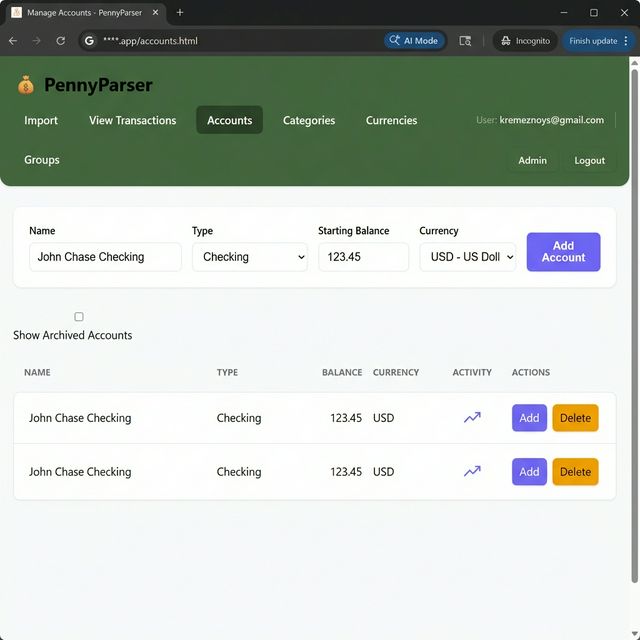
Step 2 — Create Your First Account
After logging in, the Accounts sidebar will show: "No accounts found. Create your first account →"
- Click that link (or navigate to Accounts in the top menu).
- Click the "+ Add Account" button.
- Fill in: Account Name (e.g., "My Checking Account"), Starting Balance (the amount currently in the account), and Currency (USD, EUR, UAH, GBP, etc.).
- Click Save.
2. Your Daily Workflow: Importing Transactions
The fastest way to add transactions is to paste a screenshot directly from your clipboard.
Step 1 — Take a Screenshot of Your Bank Statement
Open your bank's app or website and take a screenshot of your transaction list. Any standard bank statement view will work — the AI handles tables from virtually every major bank.
Step 2 — Paste the Screenshot (Ctrl+V)
- Navigate to the Import page (the home screen).
- Select your account from the "Select Account" dropdown at the top.
- Press Ctrl+V anywhere on the page. Alternatively, drag-and-drop an image file, or click "Choose File".
- Wait 2–5 seconds while Google Gemini AI reads your screenshot.
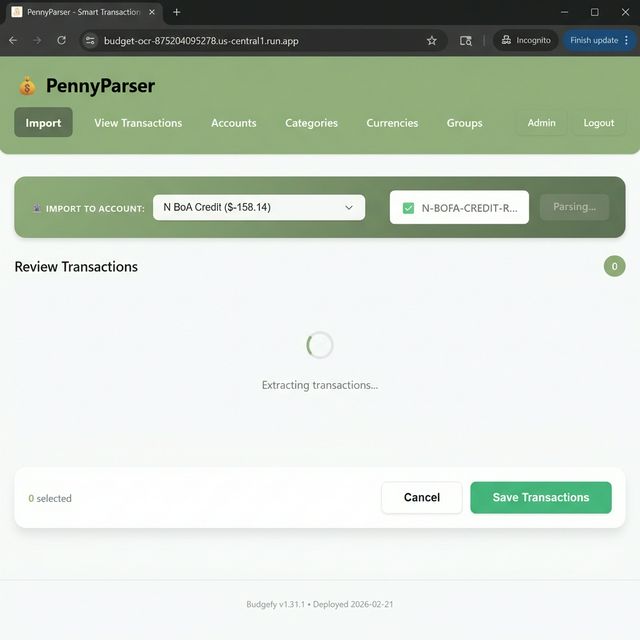
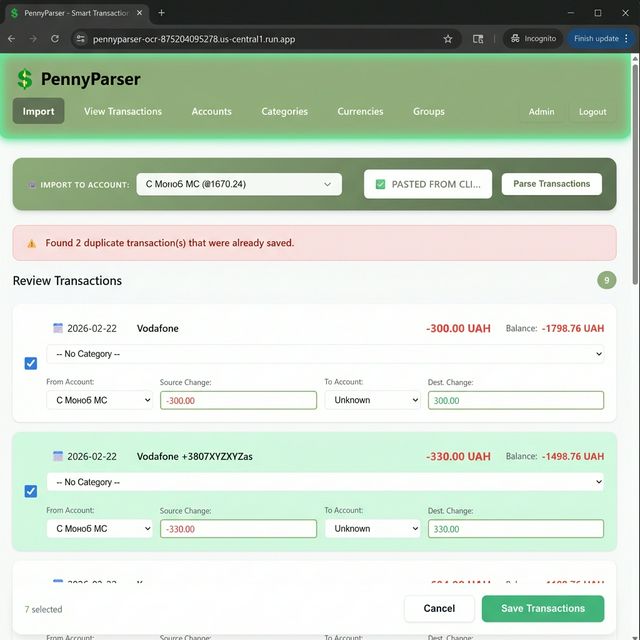
Step 3 — Review the Results
Once processing is complete, a table of extracted transactions appears. Each row shows:
| Field | What it means |
|---|---|
| Date | Transaction date read from the screenshot |
| Description | Merchant or transfer name |
| Amount | Negative = money out, positive = money in |
| Category | AI's best guess (e.g., Groceries, Transport) |
| Type | Expense, Income, or Transfer |
| ☑ Checkbox | Tick this to include the transaction when you save |

Step 4 — Save Your Transactions
- Review each row. Uncheck any transactions you don't want to save (e.g., known duplicates).
- Optionally edit a row by clicking any field (see Section 3).
- Click "Save Selected".
Your transactions are now saved and your account balance updates automatically.
3. Reviewing & Editing Your Transactions
Editing Directly on the Import Page
Click on any field in the import review table to edit it inline before saving — useful for correcting a description the AI misread or changing a category.
- After saving an edit, the updated row briefly glows with a soft pulse for 1 second — confirming your change was applied.
- The page stays at your current scroll position so you don't lose your place.
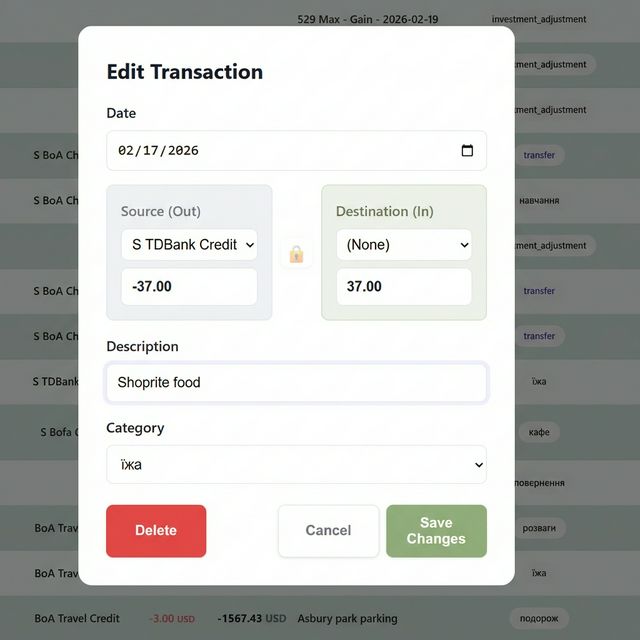
Editing a Saved Transaction (View Page)
- Go to the View page.
- Find the transaction (use the search or filter bar if needed).
- Click the ✏ Edit icon on the row.
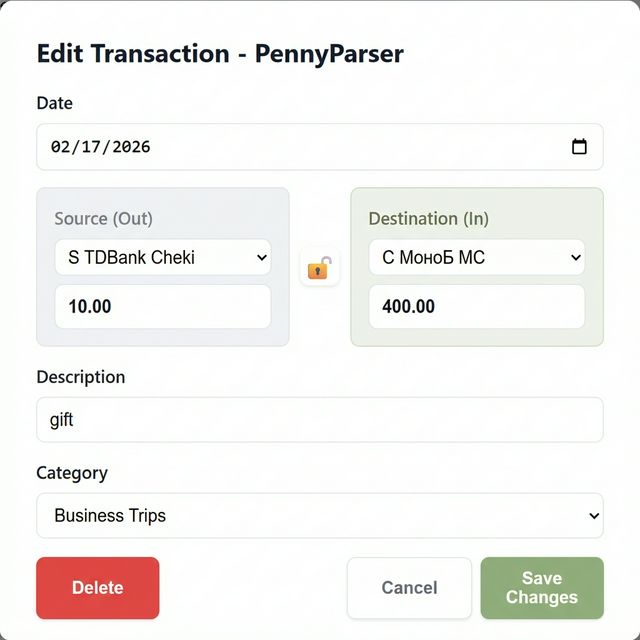
- A pop-up modal opens — change Description, Date, Amount, Source/Destination Account, Category, or Type.
- Click Save Changes.
To permanently remove a transaction, click the "Delete" button inside the edit modal and confirm.
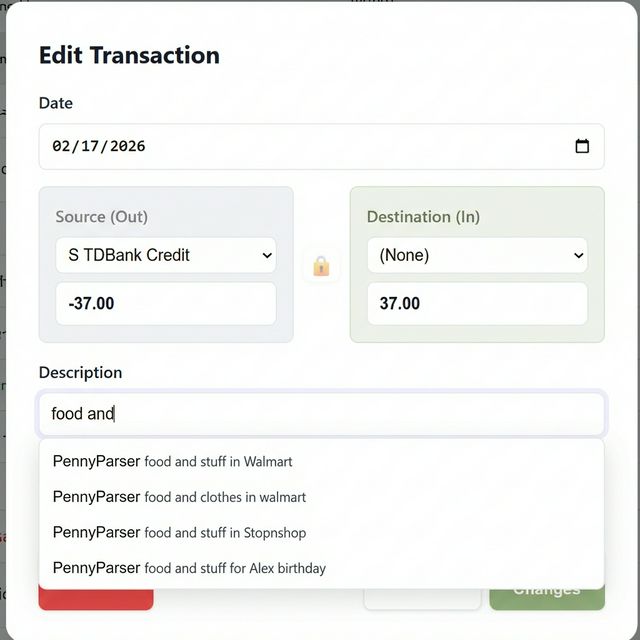
4. Smart Autocomplete: Save Time Typing
When you type in a Description field (in the import table or any edit modal), the app offers intelligent suggestions based on your own transaction history.
- The dropdown shows up to 7 suggestions, ranked by how frequently you've used them.
- Ranking looks at every word in a description — typing "Vodafone" surfaces all past entries containing that word, even if the billing month differs.
- Pure numbers (date codes like 202601) don't inflate rankings, so relevant descriptions always rise to the top.
| Key | Action |
|---|---|
| ↓ / ↑ | Move through suggestions |
| Enter | Select the highlighted suggestion |
| Esc | Close the dropdown |
5. Advanced Features
5.1 Multi-Currency Transactions
If you have accounts in different currencies (e.g., a USD checking account and a UAH debit card), PennyParser handles the math automatically.
- Open the edit or add transaction modal.
- Select a Source Account in one currency and a Destination Account in another.
- Currency symbols update dynamically next to each amount field (e.g.,
$and₴). - To enter a precise exchange rate, click the "Unlock" 🔓 icon — this lets you type exact source and destination amounts independently.
- The app displays the effective exchange rate in real time.
The Filtered Sum footer at the bottom of the transaction table shows a currency-specific total for single-currency filters, or a USD equivalent total when viewing a mix of currencies.
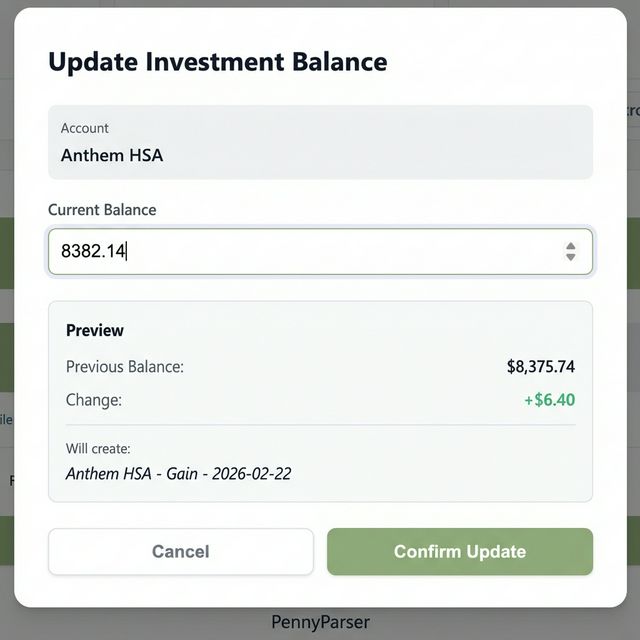
5.2 Tracking Investments (Gain / Loss)
For investment accounts (e.g., a 401k or brokerage), the balance changes due to market fluctuations. Use the dedicated Update Balance feature instead of importing statements.
- Go to the View page and find your investment account in the left sidebar.
- Hover over the account — an "Update Balance" button appears.
- Click it. A modal opens showing your current recorded balance pre-filled.
- Type in the new current balance from your brokerage today.
- The app calculates the gain or loss, creates an "Investment Adjustment" transaction, and updates your balance automatically.
5.3 Exporting to Excel
- Go to the View page.
- Click the "Export" button in the toolbar.
- Wait while the file is prepared (a loading indicator appears).
- Your browser downloads a
.xlsxfile with all transactions, accounts, and categories.

.xlsx file
downloads automatically. The spinner shows while the file is being prepared.6. Collaboration: Groups & Invite Codes
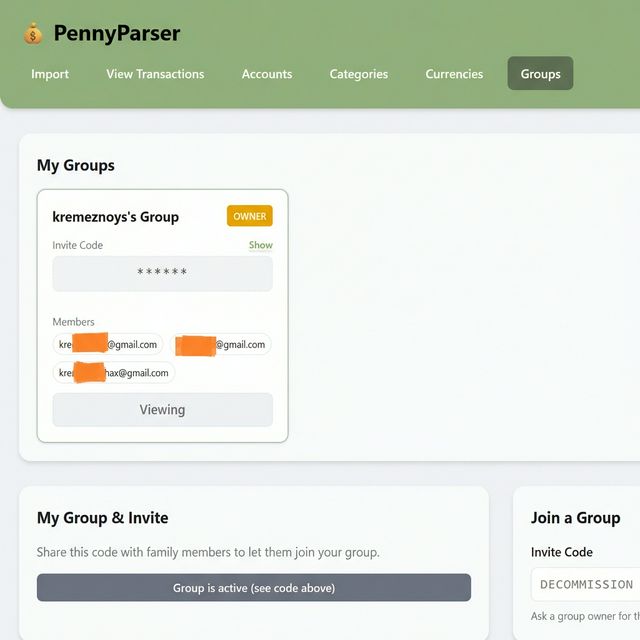
PennyParser supports shared group ledgers — useful for tracking household or family finances together.
Joining a Group
- Navigate to Groups (via the top menu, or More → Groups on mobile).
- In the "Join a Group" section, paste the Invite Code you received.
- Click Join.
Once joined, the app works entirely in group mode — all your transactions, accounts, and imports are shared with the group. A blue "Viewing Shared Data" banner appears at the top of every page as a reminder.
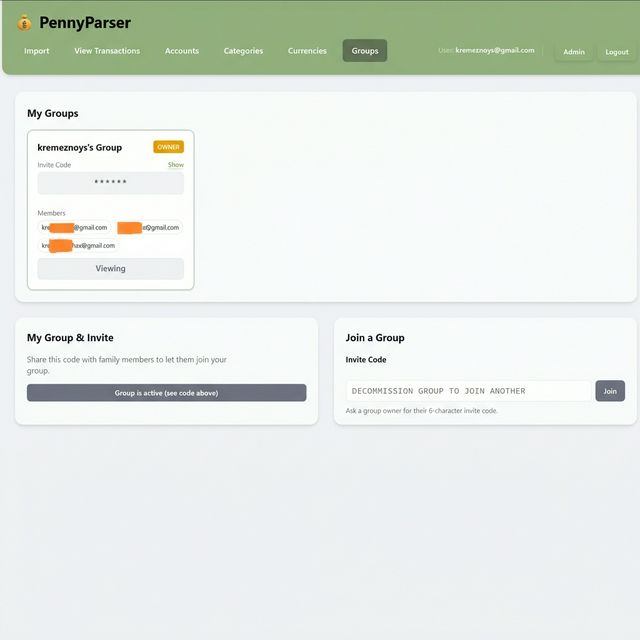
Inviting Others (Group Owners Only)
- Go to Groups.
- Find the "My Group & Invite" section.
- Click "Generate Invite Code".
- Share the code — it grants access to your shared ledger.
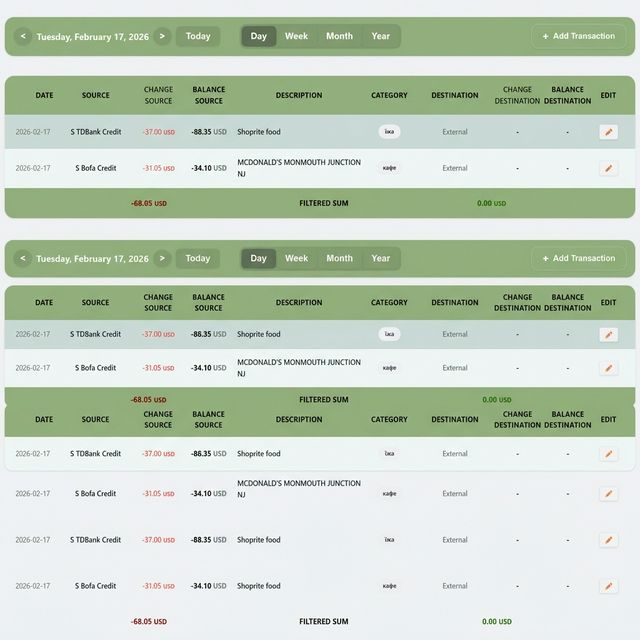
7. Viewing Your Data
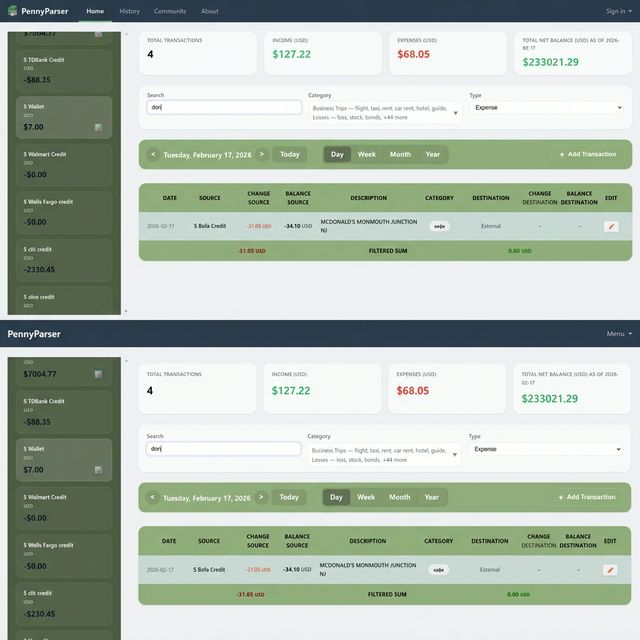
Filtering Transactions
The View page gives you powerful ways to slice your data:
- Account filter — Click an account in the left sidebar to show only that account's transactions.
- Multiple accounts — Hold Ctrl (or ⌘ on Mac) and click to select multiple accounts at once.
- Date range — Use the Timeframe buttons (Day / Week / Month / Year) or enter custom start/end dates.
- Category filter — Select one or more categories to focus on specific spending types (e.g., "Groceries" + "Dining Out").
- Type filter — Filter by Income, Expense, or Transfer only.
Understanding the Summary Footer
At the bottom of the transaction table, a persistent footer shows Total Expenses (money out) and Total Income (money in) based on your active filters.